

Notice
This tutorial might be in a better view on mobile browser due to some images resolution. You can read this article (NIP-23) on Flycat (Best View) or Habla News or via blogstack.io
Changelog
- 27 March 2023: Prevent conflict of running multiple LND in Termux. Update .env file for easier Satdress Fork setup (based on latest commit).
- 25 March 2023: Add recommendation and solution for Android OS 12+ users. Add document changelog revision. Add recommendation to backup channel.
- 23 March 2023: Initial Article
Overview
Recently, since the introduction of Zap (NIP-57), the concept of value4value has been promoted quite often and was proven partially by high engagement in quality or interesting content.

Source: Nostr Meme Competition 1st Winner Announcement by StackSats) and Ser Sleepy)
Users can publish various topic and receive sats to their lightning wallet by using lightning address. While most users seem to pick the easiest way by using custodial wallet or services (Wallet of Satoshi, LN.tips Telegram bot, etc), there are still option to setup a non custodial wallet.
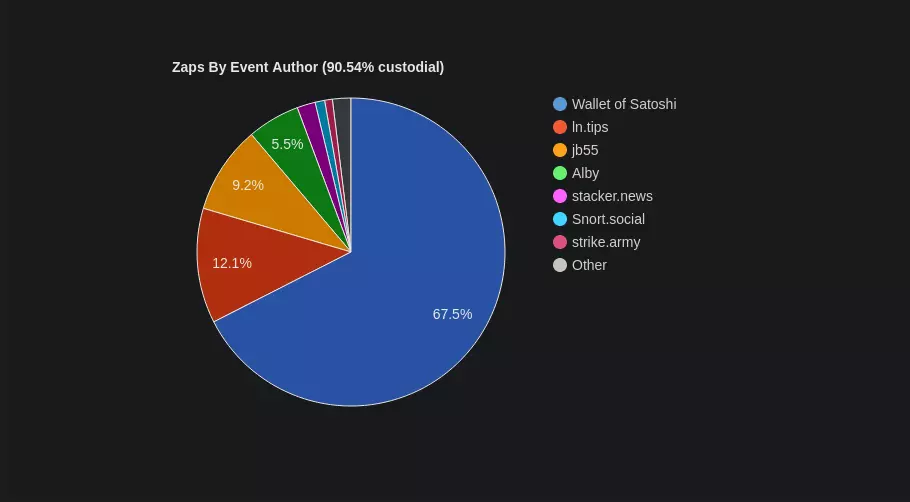
Source: Zap Analysis in Nostr by benthecarman)
But, some people might still wonder or argue,
Can i receive lightning tip or zap to my own wallet without having any server or PC?
I don’t even have domains to setup my own lightning address
There are no tutorial (yet) to do that
The answer to those question is yes. We can manage it directly on our mobile phone even if we don’t have our own server and domains.

Source: Zap Experiment Demo by lurkingcat
This tutorial aims to help Nostr users who have limited resources to setup their non-custodial wallet and receive zaps directly to their mobile phone with zero or little additional cost.
Be sovereign. Be your own bank.
Contents
Requirements
- Mobile phone with Android OS version < 12 (Been Tested Working). If you’re using Android OS 12+ then you need to read this issue and the solution to make Termux run properly in the background. Non-rooted OS won’t be a problem.
- Very basic understanding of linux command. We can start to learn some basic linux command from Linux Command Library
- F-Droid Official Client or Neo Store (F-Droid Alternative Client)
- Termux (F-Droid Version) or from their Github
- LND (ARM64 version) via Termux
- Thunderhub
- Zeus
- Satdress Fork by don’tbelievethehype) and fiatjaf)
- Cloudflared Tunnel
Installation
This section only needed to be run once until all the setup is fully completed. If you have already completed this setup then you can skip to Running Apps section. Please, read this guide thoughtfully steps by steps thus it will make easier to solve any problem during installation.
F-Droid Setup
If you don’t have any F-Droid client installed on your Android phone then you can install F-Droid Official Client or Neo Store (F-Droid Alternative Client). Personally, i have installed both of them but often to use Neo Store because of its nice user interface compared to official F-Droid client. Feel free to choose your favorite F-Droid client.
Termux Setup
Termux is an Android terminal application and Linux environment. We can download Termux from F-Droid Repository (Recommended) or from their Github.
We can search and download it easily using F-Droid Official Client or Neo Store (F-Droid Alternative Client). If you want to learn more about Termux then you can check their Wiki page.
We also need to install Termux API Plugin. This plugin will expose basic Android functionality as linux command.
Additional Recommended Software:
- Hacker’s Keyboard. This keyboard will make it easier to type linux command in Termux
- We can start to learn some basic linux command from Linux Command Library
After we have installed Termux, we need to make sure Termux and its plugin get the required permission to run in the background properly. We don’t want Termux get killed automatically by Android OS. Some vendor (Samsung, Xiaomi, etc) even have more strict battery saving mode which often kill apps in the background. We need to set Termux and its plugin as the exception.
We can press and hold Termux App icon and it will show popup “App Info” and we will click it > Battery Saver Permission > Change Battery Saver mode into “No Restriction”. This menu can be varied on every different Android device. There is a basic guideline here to adjust it based on your device.

After adjusting Battery Saver permission, we can open Termux. It will open a new blank terminal session on the first time.

We will enable android storage permission using this command (Feel free to copy and paste the command):
# mount android storage for easy access on termux
# it will be mounted on $HOME/storage
termux-setup-storage
Install all required dependency using the following commands (Run every command line-by-line to make it easy for checking any error):
# update termux package
pkg upgrade -y

# install basic dependency software
pkg install termux-services build-essential git golang lnd tor torsocks

# install basic helper tool
pkg install tmux nano micro curl wget

# enable tor service in termux
sv-enable tor
We also need to disable LND service created by Termux to prevent conflict of using multiple LND:
# disable lnd service in termux
sv-disable lnd
We will also use Proot Distro to make environment for this tutorial. PRoot Distro is a Bash script wrapper for utility proot for easy management of chroot-based Linux distribution installations. It does not require root or any special ROM, kernel, etc.
Install and setup proot-distro:
# install proot-distro
pkg install proot proot-distro

# download and install chroot linux distribution
# install ubuntu distribution and give its alias as ubuntu-nostr (name is optional can be changed)
proot-distro install --override-alias ubuntu-nostr ubuntu

We will login into proot environment:
# login as root to chroot environment and bind $HOME directory as /termux_home for easy access
proot-distro login ubuntu-nostr --user root --bind $HOME:/termux_home
Now after we login into proot environment, we need to update and setup using following commands:
# update apt repository
apt update -y

# upgrade chroot system
apt upgrade -y

# install sudo
apt install sudo
We have already finished setup Termux for the first time. Don’t close current termux session because we will continue using it for the next step. The next step is about how to configure and start lnd using termux.
LND Setup
Using the same termux session, we will start with creating LND data directory to setup our configuration.
# create lnd directory
mkdir -p ~/.lnd

# make or edit lnd configuration using nano editor
nano -m ~/.lnd/lnd.conf
This is configuration of LND for this tutorial. This configuration was adjusted and optimized (using Neutrino mode) for mobile phone/node similar to what Blixt or Breez wallet have done. We can copy configuration below to lnd.conf file. Make sure to copy from the first line to the last line of configuration. The explanation of each syntax/line was covered in LND sample-lnd.conf.
[Application Options]
alias=
listen=localhost
nat=false
rpclisten=localhost:10009
restlisten=localhost:8080
debuglevel=info
maxpendingchannels=5
feeurl=https://nodes.lightning.computer/fees/v1/btc-fee-estimates.json
gc-canceled-invoices-on-startup=1
gc-canceled-invoices-on-the-fly=1
sync-freelist=1
#wallet-unlock-password-file=/root/.lnd/p.txt

[protocol]
protocol.wumbo-channels=true
protocol.option-scid-alias=true

[Bitcoin]
bitcoin.active=1
bitcoin.mainnet=1
bitcoin.node=neutrino

[neutrino]
#neutrino.connect=YOURBITCOINNODE.onion:8333
neutrino.maxpeers=5
neutrino.persistfilters=true
neutrino.broadcasttimeout=11s

[tor]
tor.active=true
tor.v3=true
tor.streamisolation=true
tor.socks=9050
tor.dns=soa.nodes.lightning.directory:53
tor.skip-proxy-for-clearnet-targets=false

[autopilot]
autopilot.active=false

[watchtower]
watchtower.active=false

[bolt]
db.bolt.auto-compact=true
db.bolt.auto-compact-min-age=240h

[Routing]
routing.assumechanvalid=1
routing.strictgraphpruning=false
To exit nano, press Ctrl+x and type y to save.
We will use tmux in the next following steps. Tmux will be used because we can have multiple terminal window in one terminal session. It’s like having multiple ‘tabs’ in web browser.
To start tmux for the first time, we can type the command:
tmux
To detach or ‘minimize’ current tmux session, we can press the combination of key:
Ctrl+b+d
If we want to open or resume those last detached tmux session again, we can type the command:
tmux a
If you need extra guidance about tmux then you can check this Tmux Cheatsheet.

Back to main topic, in the current tmux session, we can start lnd using this command:
lnd
By default LND will look into $HOME/.lnd directory for LND data and configurations. LND will start downloading initial Neutrino headers block data.

It will take around 5-10 minutes or maybe less to download initial data with size around 159 MB.

While LND starting to download initial data, we can open new ‘tab’ simultaneously on tmux by pressing the combination key of Ctrl+b+c. It will open new second ‘tab’ shown by number [1] below

We can switch tab easily using combination key Ctrl+b+0 or Ctrl+b+1 or any number based on the tab number.
In this second tab, we will create new wallet for LND using command:
lncli create
Set the wallet encryption password, in this tutorial we will set it by 123456789 as the example. Make sure you set your own better and secure password. After typing the password we will have confirmation prompt like below. We will create new empty wallet by choosing ‘n’ option.

If we have already another existing Aezeed Mnemonic Seed then we can choose ‘y’. But remember that Aezeed Seed is different from BIP39 Seed. This tutorial assumes that we will create new fresh wallet.
Next confirmation prompt will ask whether we want to add passphrase to the seed. We will skip that for simplicity by pressing enter in keyboard.

Make sure to note 24 seed words in a secure manner.

The next time we run lnd, we just need to unlock the wallet to make it fully initialized by executing the command:
lncli unlock
Optionally, after unlocking the wallet we can also check LND status using command:
lncli getinfo
It will give basic json information like this:
{
 "version": "0.15.5-beta.rc1 commit=v0.15.5-beta.rc1",
 "commit_hash": "",
 "identity_pubkey": "your pubkey",
 "alias": "nodealias",
 "color": "",
 "num_pending_channels": 0,
 "num_active_channels": 0,
 "num_inactive_channels": 0,
 "num_peers": 3,
 "block_height": 781371,
 "block_hash": "00000000000000000002d8610c6ec71be4e42386193327b7ce1adfb47f6d12f0",
 "best_header_timestamp": "1679151331",
 "synced_to_chain": true,
 "synced_to_graph": true,
 ...
}
When synced_to_chain=true and synced_to_graph=true, it means that our node has already synced to “latest block using neutrino data” and synced to “latest LN gossip info” thus it can be used properly.
The next step is how to configure Thunderhub software to manage our node easily.
Thunderhub Setup
We will open new ‘tab’ again on tmux by pressing the combination key Ctrl+b+c. It will open new third ‘tab’ shown by number [2] below

We can switch tab easily using combination key Ctrl+b+2 or any number based on the tab number.
We start the installation of nodejs as main dependency via Nodesource repository.
Setup Nodesource repository:
curl -fsSL https://deb.nodesource.com/setup_lts.x | sudo -E bash -
Install nodejs:
sudo apt-get install -y nodejs
The following commands are based on Thunderhub official guide. We will clone thunderhub github repository and configure it using following commands:
# make sure we start from home directory
cd $HOME

# clone thunderhub repository
git clone https://github.com/apotdevin/thunderhub.git

# change active directory to $HOME/thunderhub
cd $HOME/thunderhub
We can define some environment variables that ThunderHub can start with. To do this create a .env.local file in $HOME/thunderhub directory using this command:
nano -m $HOME/thunderhub/.env.local
and fill the file with the following parameters:
PORT=3000
TOR_PROXY_SERVER=socks://127.0.0.1:9050
ACCOUNT_CONFIG_PATH='/root/thunderhub/thubConfig.yaml'
To exit nano, press Ctrl+x and type y to save.
We will create thubConfig.yamlfile based on previous .env.local file using command:
nano -m $HOME/thunderhub/thubConfig.yaml
with the following parameters:
masterPassword: '123456789' # Default password unless defined in account, change it to secure password
defaultNetwork: 'mainnet' # Default network unless defined in account
accounts:
  - name: 'Account1'
    serverUrl: 'localhost:10009' #LND RPC server
    # network: Leave without network and it will use the default network
    lndDir: '/root/.lnd'
To exit nano, press Ctrl+x and type y to save.
After completing the configuration file, we will install all the necessary modules:
npm install
and build the app using the following command:
npm run build

It will take several minutes (5-10 minutes) to build the app. After succesfully building the app we can run it using the command:
npm start

If there are no error like shown in the image above, then we can access thunderhub using web browser on http://localhost:3000

After we login into Thunderhub, we need to fund our on-chain wallet before creating lightning channel. We can generate on-chain address in the “Home page” > Click on “Receive” with “Anchor icon” > Click on “Create Address”

After the fund in our on-chain wallet has been confirmed then we can start to open lightning channel. We can open channel by using the button in the “Home page” > Quick Action > Click on “Open” > Click on “Manual Open” and we can fill the node target and other fields.

Click on “New peer”, paste or fill node target info (we can search it on amboss.space), fill channel size amount, and make sure we choose “Private” as our channel type settings. We run our lightning node only for our private use and not dedicated as public routing node. You can check this article about Private Lightning Node by DarthCoin) for extra explanation.

We need to fill all of the required fields before we can start open the channel. We need to wait at least 3 block confirmation channel before using it. The channel can be seen on http://localhost:3000/channels.
The first time we open new channel, we won’t be able to receive any sats because our new channel has no receiving capacity. We need to spend the balances (Example: Spend 50% of the balance or more) first by sending lightning transaction to another lightning wallet or using swap services like https://boltz.exchange.
After we spend some amounts, our channel state will become like this image below where remote funds amount increasing while local funds amount decreasing. It means that we are almost ready to receive lightning tip or zap.

Another important thing to note while using Thunderhub is we can easily backup our Channel using Static Channel Backup. Please always backup your channel using Static Channel Backup. This backup will be useful to recover funds if there are any problem in the future. We can Backup our channel in Tools menu of Thunderhub http://localhost:3000/tools.
The next step is how to configure Zeus. Before opening Zeus App, we need to copy admin.macaroon value in HEX format. Back to Termux, we can switch the window tab to second tab, Ctrl+b+1, or any idle tab.
Run this command and we will copy the result to Zeus later.
# Get Admin Macaroon in HEX format
xxd -ps -u -c 1000  $HOME/.lnd/data/chain/bitcoin/mainnet/admin.macaroon
We can select and copy the result by touching the screen and drag around the cursor on termux screen.

Zeus Setup
Zeus setup is quite simple. We need to open Zeus and paste the HEX value of admin.macaroon to Zeus New Node Configuration

Zeus will connect to our local node and show the balance properly. We can use Zeus as the main interface for our lightning wallet.

Cloudflared Setup
We will open new ‘tab’ again on tmux by pressing the combination key Ctrl+b+c. It will open new fourth ‘tab’ shown by number [3] below

We can switch tab easily using combination key Ctrl+b+3 or any number based on the tab number.
Cloudflared tunnel will be used to get a free domain (random domain) so we can access our lightning address from the internet.
We will download latest cloudflared tunnel arm64 version:
# make sure we start from home directory
cd $HOME

# download latest cloudflared
wget https://github.com/cloudflare/cloudflared/releases/latest/download/cloudflared-linux-arm64

# set linux permission to make it executable
chmod +x $HOME/cloudflared-linux-arm64

# rename cloudflared program
mv $HOME/cloudflared-linux-arm64 $HOME/cloudflared
We will run cloudflared tunnel and get a domain for port 17422 (Satdress Port) using this command:
$HOME/cloudflared tunnel --url http://localhost:17422 --logfile $HOME/cloudflared.log
or if you want to run it behind the tor proxy:
torsocks $HOME/cloudflared tunnel --url http://localhost:17422 --logfile $HOME/cloudflared.log

We can copy those domain (example: https://some-random-words-here.trycloudflare.com) into satdress configuration later in the next step. The domain won’t change into new domain as long as we don’t stop the command or kill Termux app.
If we want to stop the command then we can press combination key of Ctrl+C. But, this is not recommended. The domain will not change as long as we don’t stop current command or kill Termux app.
Satdress Fork Setup
We will open new ‘tab’ again on tmux by pressing the combination key Ctrl+b+c. It will open new fifth ‘tab’ shown by number [4] like the previous example. We can switch tab easily using combination key Ctrl+b+4 or any number based on the tab number.
We will clone satdress fork github repository and configure it using following commands:
# make sure we start from home directory
cd $HOME

# clone satdress fork repository
git clone https://github.com/believethehype/satdress

# change active directory to $HOME/satdress
cd $HOME/satdress

# install dependencies
go install
As of document revision in 27 March 2023, we don’t need to edit makeinvoice.go anymore. We only need to set .env variable to support private channel.
Now, we will compile and build satdress binary using this command:
go build
After building satdress binary, we will create .env file using nano in $HOME/satdress directory:
nano -m $HOME/satdress/.env
Fill .env file with this configuration:
LND_PRIVATE_ONLY=true
GLOBAL_USERS=true
PORT=17422
SECRET=123456789
NIP05=true
FORWARD_URL=""
SITE_OWNER_URL=https://nostrplebs.com/s/lurkingcat
SITE_OWNER_NAME=lurkingcat
SITE_NAME=lurkingcat
NOSTR_PRIVATE_KEY=nsec1zapaccountnostrprivatekey
DOMAIN=YOURCLOUDFLAREDDOMAIN.trycloudflare.com
You can check Satdress Fork github for parameter explanation. Make sure to replace or adjust the parameter based on your condition, especially SECRET which will be used to encrypt satdress database, NOSTR_PRIVATE_KEY which will be used to report the zap event received by our LN node, and DOMAIN with the domain that we got from cloudflared tunnel setup before.
To exit nano, press Ctrl+x and type y to save.
It is recommended and will be more secure to make a dedicated account to handle zap event (For Example: I made @Zap Report) account dedicated only for sending zap event) rather than using my main Nostr account.
Now, we can start satdress using this command:
# Load .env variable automaticly and run satdress
$HOME/satdress/satdress
We can access satdress homepage via web browser using domain from cloudflared (Example: https://my-random-domain.trycloudflare.com).
You can fill all the fields like example image below.

We can get Invoice Macaroon HEX value by using this command in one of tmux tab:
# Generate and get new invoice macaroon
lncli bakemacaroon invoices:read invoices:write
We can touch Termux screen and copy the invoice macaroon

The last thing is you can put your Nostr public key (npub) in the last field. After that we can press “Submit” and our final setup has been done.
We can copy the lightning address that we have set before to our Nostr profile settings.

(Amethyst Profile Settings Example)
We have done all the setup required so we can receive non custodial zap and setup a self-hosted NIP-05 directly in our mobile phone. The next time we want to run all those tools that we have already set then we can skip this Installation section and directly go to Running Apps section.
Running Apps
If you have already completed Installation steps before and still running or don’t stop/kill Termux, LND, Thunderhub, Cloudflared, and Satdress then you can skip this section into the next section.
This section will be useful in case of we restart or shutdown our mobile phone or if we have accidentally killed Termux, LND, Thunderhub, Cloudflared, and Satdress. We only need to run them as we don’t have to configure them a lot anymore.
This section is only serving as reminder steps to run all the software that we have configured before in Installation steps.
Running Termux
First, we need to open Termux app in our android mobile phone. It will open a new blank terminal session on the first time.
We will login into proot environment:
# login as root to chroot environment and bind $HOME directory as /termux_home for easy access
proot-distro login ubuntu-nostr --user root --bind $HOME:/termux_home
We will use tmux in the next following steps. Tmux will be used because we can have multiple terminal window in one terminal session. It’s like having multiple ‘tabs’ in web browser.
To start tmux for the first time, we can type the command:
tmux
To detach or ‘minimize’ current tmux session, we can press the combination of key:
Ctrl+b+d
If we want to open or resume those last detached tmux session again, we can type the command:
tmux a
If you need extra guidance about tmux then you can check this Tmux Cheatsheet.
Running LND
We need to disable LND service created by Termux to prevent conflict of using multiple LND:
# disable lnd service in termux
sv-disable lnd
Back to main topic, in the current tmux session, we can start lnd using this command:
lnd
LND will start downloading Neutrino headers block data.
While LND starting to download Neutrino data, we can open new ‘tab’ simultaneously on tmux by pressing the combination key of Ctrl+b+c. It will open new second ‘tab’ shown by number [1] below
We can switch tab easily using combination key Ctrl+b+0 or Ctrl+b+1 or any number based on the tab number.
In this second tab, we will unlock wallet for LND using command:
lncli unlock
and put our wallet password to fully unlocked it.
Optionally, after unlocking the wallet we can also check LND status using command:
lncli getinfo
It will give basic json information like this:
{
 "version": "0.15.5-beta.rc1 commit=v0.15.5-beta.rc1",
 "commit_hash": "",
 "identity_pubkey": "your pubkey",
 "alias": "nodealias",
 "color": "",
 "num_pending_channels": 0,
 "num_active_channels": 0,
 "num_inactive_channels": 0,
 "num_peers": 3,
 "block_height": 781371,
 "block_hash": "00000000000000000002d8610c6ec71be4e42386193327b7ce1adfb47f6d12f0",
 "best_header_timestamp": "1679151331",
 "synced_to_chain": true,
 "synced_to_graph": true,
 ...
}
When synced_to_chain=true and synced_to_graph=true, it means that our node has already synced to “latest block using neutrino data” and synced to “latest LN gossip info” thus it can be used properly.
Running Thunderhub
We will open new ‘tab’ again on tmux by pressing the combination key Ctrl+b+c. It will open new third ‘tab’ shown by number [2] below
We can switch tab easily using combination key Ctrl+b+2 or any number based on the tab number.
We can run Thunderhub using the command:
# change active directory to $HOME/thunderhub
cd $HOME/thunderhub

# start thunderhub using npm
npm start
If there are no error like shown in the image above, then we can access thunderhub using web browser on http://localhost:3000
Running Cloudflared
We will open new ‘tab’ again on tmux by pressing the combination key Ctrl+b+c. It will open new fourth ‘tab’ shown by number [3] below
We can switch tab easily using combination key Ctrl+b+3 or any number based on the tab number.
Cloudflared tunnel will be used to get a free domain (random domain) so we can access our lightning address from the internet.
We will run cloudflared tunnel and get a domain for port 17422 (Satdress Port) using this command:
$HOME/cloudflared tunnel --url http://localhost:17422 --logfile $HOME/cloudflared.log
or if you want to run it behind the tor proxy:
torsocks $HOME/cloudflared tunnel --url http://localhost:17422 --logfile $HOME/cloudflared.log
We can copy those domain (example: https://some-random-words-here.trycloudflare.com) into satdress configuration later in the next step. The domain won’t change into new domain as long as we don’t stop the command or kill Termux app.
If we want to stop the command then we can press combination key of Ctrl+C. But, this is not recommended. The domain will not change as long as we don’t stop current command or kill Termux app.
Running Satdress Fork
We will open new ‘tab’ again on tmux by pressing the combination key Ctrl+b+c. It will open new fifth ‘tab’ shown by number [4] like the previous example. We can switch tab easily using combination key Ctrl+b+4 or any number based on the tab number.
We will edit .env file using nano in $HOME/satdress directory:
nano -m $HOME/satdress/.env
Make sure to replace or adjust the parameter based on your condition, especially DOMAIN with the new domain that we got from running cloudflared tunnel before.
Example:
From old domain
DOMAIN="my-old-cloudflared-domain.trycloudflared.com"
into new domain
DOMAIN="my-new-cloudflared-domain.trycloudflared.com"
To exit nano, press Ctrl+x and type y to save.
Now, we can start satdress using this command:
# Load .env variable automatically and run satdress
$HOME/satdress/satdress
Now, we need to change the lightning address in our Nostr profile settings especially if our cloudflared domain has been changed.
(Amethyst Profile Settings Example)
We have done all the setup required and run all the software required to receive non-custodial zap. This section is simpler than installation steps since we only need to adjust new domain for our lightning address.
Zap Experiment Result
I have done the experiment (in my Main Account and Zap Report account) for receiving non-custodial zap since 16 March 2023 and it has been quite a success and have no problem so far. Running LND and several software for 24⁄7.

Source: Zap Experiment Notes by lurkingcat

Source: @Zap Report)
There might be some questions related to this experiment:
What about your battery usage if you run it 24⁄7?
Based on my observation, Termux consume around 20% of battery power while running LND fully 24⁄7. We can calculate how many hours our battery will last based on the average normal standby time times by 20%. The energy consumed is still in acceptable rate considering that how long the phone will last in normal idle state.

What about your data usage if you run it 24⁄7?

Based on my observation, Termux consume around 210 MB a day with 8-9 MB average data every hour. The data usage mostly comes from LND which regularly sync Gossip Network data and Neutrino block data. This is the fair minimum of data usage by LND.
Based on this experiment, i can say that running our own LN node and configure it for receiving non-custodial zap is feasible even with limited devices such as our mobile phone since we only run it as a private lightning node instead of a public routing node. We don’t have many burden complexity to manage and rebalance the channel like what public routing node operator have done. The problems will arise if we announce our channel as public channel instead of private channel like we have done in this tutorial.
Afterwords
Congratulation, you have finished this tutorial. Now, you have become a sovereign individual who manage their own bank.

Source: TheQuotes
All credits to FOSS devs who have contributed on development of Termux, LND, Zeus, Thunderhub, Satdress Fork, and Cloudflared. Please support them in any ways.
Let me know via Nostr) if you encounter any problems. Any feedback will be appreciated to improve this tutorial. Thank you.
If you found this tutorial were useful, feel free to send some sats ⚡ to lurkingcat@pushing-talk-belief-singles.trycloudflare.com or lurkingcat@stacker.news, it will be greatly appreciated.
This tutorial has been written using Markor - Markdown Editor.